How to Build a Concrete Retaining Wall: for your home
How to Build a Concrete Retaining Wall: for your home
(By Jesse Bennett: December 12, 2018, Victoria, BC)
First I just want to say, this involves some degree of skill and attention to detail, so building this project will require a sharp mind and body. Alright, now in this article I am going to teach you how to build a concrete retaining wall in your yard, on your property or anywhere for that matter. You may be looking for a wall to block off an area, section off a bank that drains water onto your deck, or walkway, or pathway. Or you may have a bank that is actually drifting in down towards something like a driveway or home and is a serious safety issue. In some instances, retaining walls are needed, and in others they are not, but whatever your application is, you will be able to achieve results after reading this article. You may not have all the tools, you may not know how to use all the tools either, but after reading this article, you will have the comprehension to achieve results.
Alright, so first things first, you are going to need certain tools, or have access to certain tools and materials:
Skill saw and or Table saw
Hammer drill
3/16 hammer drill bit 6”
Grinder
Cutting disc 4”
Drill
3/4” drill bit
Shovel
Hammer
Sledge hammer
stringlne
chalk line
trowel
wheel barrel
rake
hose
4’ level
Laser level (optional)
compactor
palm nailer
Compressor
Optional - Excavator
Materials:
3/4” Plywood
5/8 rebar
2x4 lumber
tie wire
champfer
finishing nails
2 1/4” common nails
3” duplex nails
8” wall ties, either cone or circular (size of ties determines size of drill bit needed)
concrete/truck
Marker paint
epoxy
3/4” crushed roadbase
Stakes: wooden or metal pegs (rebar is another option I prefer)
Our scenario with the home owner is that that they want to retain a bank that has a sidewalk on it and is drifting or slowly moving and cracking towards their driveway. Now this circumstance involves safety, and also involves ensuring people who come close to the jobsite, as in walk on the sidewalk that is actually cracking due to this moving bank, will be safe. So the dimensions are roughly 25’ long, going from about 2’ high, to roughly 6’ and the other end. This area is all bank at the moment, and will need to be removed so that a wall can be erected and also space for the forms to be built and removed after the concrete has set.

So first things first, you want to lay out the area of land that needs to be excavated. One method for this is to setup a string line from point A to Point B. In this circumstance we are going 25’ from point A-B. So we setup a stake at point A, and a stake at point B, and tie a string line between the points and make sure it is tight. Next you take marker paint and run your paint can alongside the string line as a guide while spraying the ground in a fairly even fashion. Now you want to make sure the line you draw is about a foot or more beyond the dimension of where the eventual wall will rest. This is because you will need space to build the footing and the form, then space to remove it. Because one side of this wall is a bank, and the other is a driveway, between the wall and the bank will be difficult to work in depending on much space you leave yourself while marking this line. So be warned that this line and where it is ;aid out will determine the flow of the job. In this circumstance we marked the line 1.5’ beyond the point where we will have the final wall.
So you sprayed your line and now it is time to excavate the ground. Ensure that the ground is not too wet or questionable with its integrity, you want to be safe and avoid any slides. In this circumstance because I have experience operating excavators I am going to excavate this ground, to both save time, and increase safety. Please note, anytime you start digging in your yard or anyone’s, you want to be sure of where the utilities are located, so that you avoid breaking any gas lines, water lines, or electrical lines. So attain utility drawings from the city, or utility company in your area. So you begin excavating, either by shovel or machine, drawing your dirt or fill to a place where it can be managed, either removed from the site or moved to a place where it is out of the way. The depth you go when removing the dirt is important because you will need to have room for your footing, which in this case will be a 20” footing. Thus, you will remove an area about 26” back from your line and roughly 10” deep beyond where the wall will meet the footing, (finished grade). You remove all the dirt up to the point where you drew your marker line, between point A and B and 10” deeper then where the finished wall will meet the top of your footing. Now you have an excavated area, so next you will need to bring in your fill that will form the base or bed for the footing to rest on.
With your 3/4” crushed gravel, you will take it and spread it out over the entire 25” by 26” area you have dug out. You want to spread it at about 9” or an inch below your grade. This is because we want to ensure that after it is compacted, the footing will not rest higher then finished grade, otherwise you will be removing material, and creating more unneeded time. So you have spread all your gravel out over the distance and rake it out evenly. It is important that you get thi part right and enuire it is evenly distributed, because next you will be compacting it, and any uneven areas will be compacted and therefore harder to level out after.
Next, you will take your hose, spray down all the gravel, and then take your compactor and go over the entire area, compacting it, and making sure it is entirely compacted. This will be fairly quick. Note: if you see any areas that are not level, this is the time to take the rake and level them out and then re compact them.
Alright, so you have compacted the whole area, it is firm and ready to receive a footing. Next you want to setup 2 string lines from point A to B 25’ long and 26” apart from one another and about a foot off the ground. You will do this be staking in 4 points, on each of the 4 corners. Next you will be taking your 2x4 lumber, and measuring out the dimensions for your footing. Now your footing is the part of the wall that no one will see, it rest beneath the wall and provides an upside down T, to prevent the wall from tipping, providing leverage and support. So this footing is going to be roughly 25’ x 26” x 3.5” thick. This means that you will have to have enough 2x4 to do this, which equals out to approximately 56’ of 2x4. Now depending on what lengths of lumber you buy, will determine how many places you will have to bind the 2x4 together along the two 25’ lengths. So here we have got 10’ 2x4s, which means that we will need to bind them together in 2 places on each run.
Alright so your dimensions are 25’x26” so two 10’ and one 5’ piece on each side, and then on the end we will have 2 29” pieces. In order to bind the 2x4s together we use what we call a scab, this is where we take about a 2’ piece of 2x4 and attach it to one of the 10’ pieces with 1’ attached on one, and the other 1’ section attached to the other 2x4. You can use whatever you want to bind them, however note that screw heads can get filled with concrete and be a pain to remove afterwards, so were using 3” duplex nails to bind the scabs to the 2x4.
After you have your 2x4 scabbed together to make 2x25’ lengths, you place them in the dug out area underneath the string lines, on edge with the scabs facing outward, with them roughly in line. Next take one of the 29” pieces of 2x4 that you have cut with the skill saw and attach it to one of the ends of the 25’ piece laid on edge by hammering in 2 duplex nails, hammering through the 29” piece into the 25’ piece on each side, then repeat on the other end. (click here to learn how to cut with a skills saw). So now you have a big long box that is neither square nor level. Next you want to line up the box so it is roughly in line with the string line box.
Now if you have a laser level this is the time to bring it out, if not you can use a 4’ level. Here you want to find your highest point on the entire span of the rectangle. Take the 4’ level and go over it entirely, placing it on each top edge and determining by following the bubble, to where is high and low. If you have a laser level then take it and project your laser to find the highest spot. Once you have your highest point you are going to stake that point with either a wooden stake, metal peg, or as I do, cut rebar piece. Now fastening your stake to your footing form is up to you, but most will use duplex nails, but remember this is working in tight parameters so to hammer down here is hard, because your span to swing is very short. I prefer rebar with pipe strapping with a screw on each side. After you have your high point secured to a stake you will be moving the rest of the form up to that grade by working your way outward from the high point. As you go, stake each point that is brought up to level, securing it every 4’ with a stake, peg, or rebar.
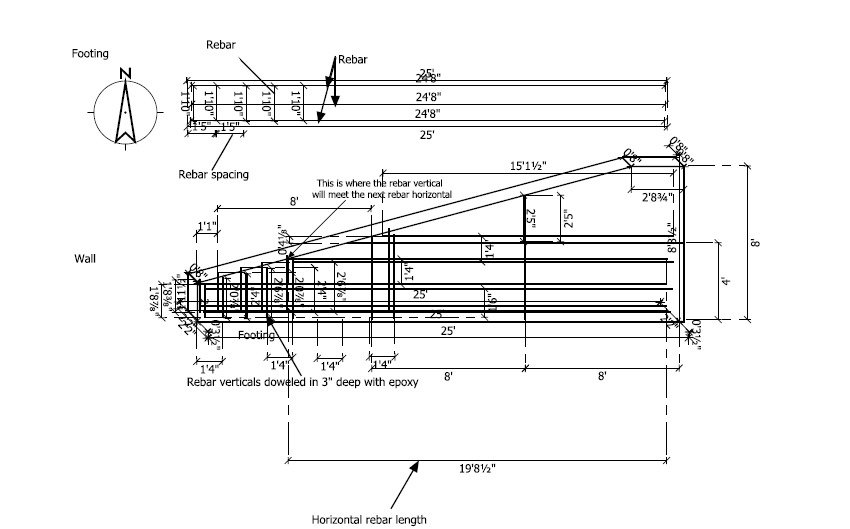
After you have got your footing levelled off and secured by staking it every 4’ and on each corner, you are ready to cut, lay and tie rebar. So our grid is going to be 24’ 8” by 20” with one 24’8” piece in the middle at 10” for this job:
3 x 296”
17 x 22”

So go ahead and take out your grinder, put a cutting disc on it, put on eye and ear protection, and cut your pieces. Next lay them out in a grid spacing as is outlined in the drawing. Once you have your rebar cut and laid out in a grid your going to tie it at every crossing joint with tie wire. What you do is take the tie wire, cut about 10 inch pieces and double them up so they are about 5 inches and wrap each one around the joint, then grip the wire with your linesman pliers and twist till it is tight. Once all the rebar is tied we are finished the rebar for the footing and are ready for some concrete.
Now in order to pour concrete you will have to know how much you need and how you plan on getting it to the actual form. In this instance our cubic meter number for this footing pour is 25’ x 26” x 3.5” so that calculates to 300” x 26” x 3.5” = 27300 cubic inches which is .45 cubic meters. Generally, you want to add on a bit extra to ensure you don't fall short for the pour, so we will add .2 equalling .47 in total. Now we are able to get a truck backed in to where the driveway is outside this footing so we can use a wheel barrel and shoot to get the concrete into the footing. No need for a pump truck at this stage, however we will need it when we pour the wall.
Alright so it is pour time, you got your gumboots on, you have ordered the truck, the drive way is clear, and your ready to spread out the concrete, preferably with help. Concrete is a game of speed to race against it setting. In this instance we are using 32 mpa (5000 psi) strength concrete so it will set off within an hour given normal temperatures. If it is cold out add on time for sure. So because of the span on this pour, it would be good to have someone to help spread it. So begin at the far end working your way back towards the truck begin dumping the concrete into the form, spread it evenly up to par with the form. Once it is all filled, you then begin to screed it off with a 29” 2x4 that is wayne free, by shifting the board from side to side on edge pulling it towards yourself as you move down the form. Once you have screeded it all, you can now trowel it out. This takes a bit of getting used to, but what you want to focus on is simply moving the trowel in a figure 8 motion switch edges up and down as you go from left to right, evening out the concrete and working to a point where it is creamy. Once you have a nice even surface of concrete you are done and you can let it cure.
After the concrete has cured for a day, (depending on the weather), you may need longer, you can strip the forms. Stripping the forms is when you remove all the lumber from the forms, which means you want to remove all the nails, stakes, pegs or rebar, and be careful not to damage the concrete, because it will only be partly cured. It takes 28 days for concrete to fully cure. Once you have all your nails, screws, and pegs removed, you want to hammer the lumber a bit to free it up from the concrete and loosen it up perhaps with a pry bar, being gentle. Once you get all the lumber removed, then you will be ready to lay plates on.
In order to lay plates (2x4 laid flat), you will have to layout the bottom of the wall that will rest on top. So the dimensions for the wall are 25’x8” which means that the plates will border the base of the wall rectangle shape. Please see the following diagram for an illustration of what I am saying.
 As the drawing illustrates, the plates will run along the top of the concrete footing in a border like fashion around the edge of the base of what will be the wall. The plates will hold the plywood firm to withstand all the pressure from the concrete.
Setting up the plates is done by measuring out 6” from each side of the footing on the lengths, and 3.75” inward from the ends. Do this so that you get an inner rectangle. Begin with marks every 4’ that you will then chalk line after to get your layout. Once you have markers from corner to corner, take your chalk line and do the lengths, then take a framing square on the end of each length lines and place one side parallel to the line and mark square from that end and then do the same on the other end. This will square your rectangle so that the wall will be square also.
 After laying out the base of the wall, you will then cut your plates to fasten to the footing. The two end pieces will be 15” and the
lengths are 25’ which in our case will be 2 - 10’ and 1 - 5’ laid out along the straight chalk lines. Once all the lumber is laid
out flat along the chalk lines bordering the base of what will be the
wall, you will then drill in holes with the hammer drill using a
3/16th hammer drill bit. While the plate is lined up with the chalk
line, holding it steady, you take your hammer drill and begin
drilling your first hole, recessed in about 3/4” from the edge of
the 2x4 and about 2” from the end. You want to drill in about 2 inches deep past the 2x4 plate into the concrete footing.
After laying out the base of the wall, you will then cut your plates to fasten to the footing. The two end pieces will be 15” and the
lengths are 25’ which in our case will be 2 - 10’ and 1 - 5’ laid out along the straight chalk lines. Once all the lumber is laid
out flat along the chalk lines bordering the base of what will be the
wall, you will then drill in holes with the hammer drill using a
3/16th hammer drill bit. While the plate is lined up with the chalk
line, holding it steady, you take your hammer drill and begin
drilling your first hole, recessed in about 3/4” from the edge of
the 2x4 and about 2” from the end. You want to drill in about 2 inches deep past the 2x4 plate into the concrete footing.

After you have finished drilling your first 2 holes, take a 3.5 inch duplex nail, along with a piece of tie wire cut to about 10” doubled up to 5”. Next, stick the doubled up wire in the hole, then the nail, and begin nailing the nail till it is secured all the way in. Repeat this step for each hole till you have secured the plated along the perimeter of the wall base.
Okay, so now that the plates are fastened, you are ready to begin drilling your holes for your rebar. Now this is not an engineered wall, or designed to withhold a certain load, but we have taken the needed steps to ensure this wall will stand and take a load for many years to come, which means having the vertical rebar drilled in every 16” in length and holes being 6” apart.
 Once all the rebar holes are drilled, it is time to measure and cut the rebar for verticals to be dowelled into the drilled holes. Now the wall tapers from 2’ all the way up to 8’ which means that there
will be various different size cuts for the verticals. Spacing them
every 16” There will be 18 pairs of different sized verticals to be
exact. You will have to get the dimensions for these by measuring out
each one. As you can see in the following drawing, the sizes go from
18 7/8” up to 26 7/8” for the first 4, of the 18, so there are a
few measurements here. When your measuring for rebar, make sure you
remain 2 inches away from any outer area of the wall. This means that
there will be 2” less all measurements you take that measure from point A – B. For example the lengths of rebar that are being
installed for the 25’ horizontals will measure out at 25’ - 4” = 24’ 8” meaning that the length is les 4 inches, accounting for
the 2 inch gap at each end. Now we are spacing the horizontal lengths
at 16” apart. SO as they begin to get stacked you will see quickly
that each row will be smaller then the last. For example the first 2
rows are the same at 24’ 8” however, the third row is less, with
the pair actually at 19’ 8 1/2” and as you go on to the next pair
the same applies, being at 15’ 1 1/2”.
Once all the rebar holes are drilled, it is time to measure and cut the rebar for verticals to be dowelled into the drilled holes. Now the wall tapers from 2’ all the way up to 8’ which means that there
will be various different size cuts for the verticals. Spacing them
every 16” There will be 18 pairs of different sized verticals to be
exact. You will have to get the dimensions for these by measuring out
each one. As you can see in the following drawing, the sizes go from
18 7/8” up to 26 7/8” for the first 4, of the 18, so there are a
few measurements here. When your measuring for rebar, make sure you
remain 2 inches away from any outer area of the wall. This means that
there will be 2” less all measurements you take that measure from point A – B. For example the lengths of rebar that are being
installed for the 25’ horizontals will measure out at 25’ - 4” = 24’ 8” meaning that the length is les 4 inches, accounting for
the 2 inch gap at each end. Now we are spacing the horizontal lengths
at 16” apart. SO as they begin to get stacked you will see quickly
that each row will be smaller then the last. For example the first 2
rows are the same at 24’ 8” however, the third row is less, with
the pair actually at 19’ 8 1/2” and as you go on to the next pair
the same applies, being at 15’ 1 1/2”.


 Once you have all your vertical and horizontal rebar cut, it is time
to cut the final two pieces that stretch on a diagonal from the top
of the wall down to 2” below the 2 foot height at the other end.
These two pieces will be 22’ 10”. As you can see in the following
diagram the diagonal length will attach to the tops of each vertical
length of rebar.
Once you have all your vertical and horizontal rebar cut, it is time
to cut the final two pieces that stretch on a diagonal from the top
of the wall down to 2” below the 2 foot height at the other end.
These two pieces will be 22’ 10”. As you can see in the following
diagram the diagonal length will attach to the tops of each vertical
length of rebar.
 At the top of the wall where the diagonal stops and the wall becomes level for a short 2’ 8 3/4” segment, there will be some smaller
cuts for the horizontal pieces. These two pieces will be roughly 2’ 6 3/4”
At the top of the wall where the diagonal stops and the wall becomes level for a short 2’ 8 3/4” segment, there will be some smaller
cuts for the horizontal pieces. These two pieces will be roughly 2’ 6 3/4”

Once all the rebar is cut, you can begin to install it, starting with the verticals. Now you have drilled holes, but the rebar must also be epoxied to ensure a solid adhesion to the footing. In theory the concrete that will be pouring into the form will adhere the rebar to the footing, however with way concrete works, chances are it will not get into the hole deep enough, nor would it have enough tack, to adhere the rebar into the footing, so the verticals will need to be epoxied into place. This is down with either an Hilti Hit, or an common cocking gun with a company like Quickrette concrete epoxy. You will squeeze the epoxy into the hole, enough to just about fill the hole, then you dip your rebar into the hole, twist it a fair amount, ensuring the epoxy sticks to the hole and the rebar, and then let it set and move onto the next: (note, this epoxy sets within minutes so your acting time must be swift). You will have to epoxy all 18 dowels into their holes. Once all the verticals have been epoxied into their holes you are ready to fasten the horizontals with tie wire and pliers. Take the wire, form a loop doubled up, then take that loop and loop it around the join between the two pieces of rebar. Take your pliers and grab each end of the loop together, between the pliers and then twist the pliers until the wire is tight and has cinched up the rebar together without any slack. This is called tying rebar, and their are machines that can do the same thing, however, they are just coming out and I have yet to see one at any residential job site i have been to. There are those who use rebar ties, with the little tool that grabs the loops and ties them together. I find these types of wire to be weak and I often break them when attempting to cinch the rebar together tightly.
Once all the rebar is bound together with tie wire, you are ready to start measuring and cutting your ply wood. Now I have gone to the extent of sectioning off wall drawing to get all the dimensions of the plywood into 8’ sections, which will allow me to first determine how many pieces of plywood I need, and secondly allow me to get my dimensions for making cuts prior to installing any of the plywood. Now some may say that pre-cutting can lead to issues, measurements may be off slightly, which can cause serious deficiencies. This can be true in some cases, and I will only go as far as saying that here, I have taken the time to properly layout the plywood onto the drawing, which will line up perfectly if everything is built to specifications. This will save time in two ways. Firstly, when you cut your ply you can cut two sheets at a time because each side is a mirror image of the other. Secondly, making all your plywood cuts at the same time, verse cutting, building, and then measuring, and repeating, drains time beyond what is needed. So, taking the time to draw out the dimensions accurately for cuts is a huge step in saving time. Furthermore, I have also added in the drill hole marks for where the concrete ties will go through. These holes are drilled on each side of the plywood, and will bind the wall together provide support for the form to stay upright, essentially tied together. As you can see the holes on the second sheet at the high side of the wall line up just after the sheet meets the sheet below it. Being able to know where to drill these holes prior based on an accurate drawing is very valuable for saving time. In this case we have a 5” mark to layout on that second sheet, and we also know the dimensions to cut it at, accounting for the angle, that would be hard to do without a drawing.


Alright, so now that you have your dimensions for your plywood and your layout points for your drill holes, you can go ahead and layout the lines and marks for cuts and drill holes. I personally use a skill saw to cut the plywood and an impact with a speed tip, to drill the holes. The ties you use for the wall will determine the size of the holes you will be drilling. In this case, the cones are 3/4” so we will be using a 3/4” drill bit to dill these holes. Remember you are able to drill and cut 2 sheets at a time, because everything is replicated or mirrored with this form. So go ahead and mark 2’6” on one end of the ply, then on the opposite corner measure from it 2’ 6 3/4”, and same on the other corner of that end. After you have cut and drilled all your holes you are ready to assemble the walls.
Assembling the plywood to the bottom plates can be difficult, yet is essential in keeping the plywood down and in place when you plumb it out. So in order to begin, you will either need to get a small hammer or a palm nailer (https://www.canadiantire.ca/en/pdp/mastercraft-palm-nailer-0588987p.0588987.html?gclid=Cj0KCQiAgMPgBRDDARIsAOh3uyIIpL-GIeJ9TOho1NjeXMnpTYyxctS6yWL49iZbVqFfatvfNPVJv4caAlMXEALw_wcB&gclsrc=aw.ds#store=366)
At the bottom of the form where your plates rest you will be placing your first sheet of plywood. You will start with your first full sheet, making sure it is the right sheet because it does matter where the holes line up. Place the sheet long ways down, so the 8’ span rest entirely on the footing between the plates and the rebar, butting up against the corner of the plates

 Once you have placed your plywood onto the footing up against the 2x4 plate, in the location the drawing specifies in blue dotted lines, starting with the side closest to the bank, then you are ready to fasten the bottom to the 2x4 from the inside of the plywood onto the 2x4. To do this you will need your palm nailer. Begin setting 2 1/4” common nails into the bottom of the plywood on the inside nailing
into the 2x4 at the bottom plate. Set the nails and then drive them
home with the palm nailer. This may prove to be a difficult task for
you alone and you may need someone experienced in order to help you.
But this step is very important. However at this point there is no
need because there is access. Once the exposed side of the wall is
being installed it will prove easier to place a spacer then nail the
bottoms. Continue on nailing the bottom of each piece of plywood as
you add more plywood to one side. Once you are finished one side,
move to the other side and repeat, except now you will have to bend
over in order to get the nailer in between the rebar and the plywood.
This will prove tricky for even the best and skilled men or women.
Once you have placed your plywood onto the footing up against the 2x4 plate, in the location the drawing specifies in blue dotted lines, starting with the side closest to the bank, then you are ready to fasten the bottom to the 2x4 from the inside of the plywood onto the 2x4. To do this you will need your palm nailer. Begin setting 2 1/4” common nails into the bottom of the plywood on the inside nailing
into the 2x4 at the bottom plate. Set the nails and then drive them
home with the palm nailer. This may prove to be a difficult task for
you alone and you may need someone experienced in order to help you.
But this step is very important. However at this point there is no
need because there is access. Once the exposed side of the wall is
being installed it will prove easier to place a spacer then nail the
bottoms. Continue on nailing the bottom of each piece of plywood as
you add more plywood to one side. Once you are finished one side,
move to the other side and repeat, except now you will have to bend
over in order to get the nailer in between the rebar and the plywood.
This will prove tricky for even the best and skilled men or women.
After the first row of plywood is placed, it is time to begin installing 2x4s along with snap ties, you do this by attaching the snap tie walls on the plates that will form the base for the first and second row of plywood to be fastened to. These studs will be vertical 2x4s going up every 16” offset next to the holes drilled in the plywood. They will form the base to fasten the concrete wedges that will hold the ties. To fasten these studs, first cut them to length using your skill saw, make sure the end is cut square. Next, mark out your layout on the plate, make sure it is square also. Line up the 2x4 with the layout line and then nail it in, or screw it in, using a hammer, nail gun, or impact. Once it is fastened onto the plate, line up its flat side for plumb, and then nail into it from the inside of the plywood, securing the plumb position. Next, take a stake and hammer it in about 4’ away from the 2x4. Then take a measurement from 3/4 of the way up on the 2x4 down to the stake, and cut a 2x4 to measurement. Next fasten it to the stake at one end with a screw or nail, then hold the other end, while someone else holds a level on the stud, once the stud is plumb, fasten the 2x4 to the stud using a screw and an impact.
Snap Tie Burke Bracket:

Next repeat these steps with every fourth stud, on the inside face of the wall, securing them plumb and into the plywood from the inside.
After you have every fourth stud plumb and secured, it is time to attach the second row of plywood. Begin at the high side with the larger sheet, place it on top of the first sheet and then line it up making sure it is flush at each end. Fasten it to the 2x4 studs from the inside using either a hammer or palm nailer.
Alright so you have all your plywood fastened to your studs on each side, the next step is to fill in your ends. These two pieces will both be 8” wide, but in different heights, one at 2’ and the other at 8’ so you have 8” x 2’ and 8” x 8’. These two pieces will go in between the two walls on each end and will be hammered in with 2 1/4 common nails through the outside of the plywood walls on the edge and end of each wall.
Next you will run some horizontal 2x4s along the entire span of the wall, attached to the studs on edge. You want to have 2 doubled up 2x4 on edge attached to the studs about halfway up, at 4’. This will act as a support brace keeping the wall in line and supported. Attach this brace with nails or screws by toeing it in. Once it is attached you then will be placing a stake in between the already placed stakes, measuring for a brace to the horizontal brace on the studs, cutting the brace and attaching it on an angle, ensuring the wall is plumb which doing so. Once every gap is filled in between the stakes with a brace support, the wall is plumb on both sides, then you are ready to reinforce yours ends of the wall.
Reinforcing the ends of the wall is done by attaching 2x4 on each end into the studs that are close to the end, either by screws or by nails.
Note: in some circumstances attaching a stake isn't as easy or supportive as laying a 2x4 plate down on the ground, roughly 2 ‘ long, and drilling 2 holes spaced out evenly through it. Next, with a sledge hammer drive metal pegs through those holes into the ground. Once the plates are secure you are then able to use them to fasten your braces to from the wall stud or horizontal bracing.
Next install horizontal bracing (doubled 2x4) on the higher tier of the wall, and attach braces from these braces to plates on the ground, making sure the wall is plumb each time you brace it further.
After you have your studs all lined up in line with the drill holes, right next to them, you are ready to install the concrete ties, which will hold each side of the wall together. This is done by sticking the concrete tie through both holes on each boards, then taking one end of the tie, attaching it to one of the tie wedges, leaving it fairly loose, but attached, and then attaching the other side to a wedge, and then tightening it fairly tight but not too tight. These act as supports to keep the wall 8” apart and hold the wall together.
Once the wall is fully braced you are ready to calculate the amount of concrete needed for the pour. On this job the wall calculation for concrete is 2.52 cubic meters, plus a .2 for safety, equalling out at 2.72 cubic meters. In order to get to that calculation there is a bit of measuring and calculating afterwards. If you would like the details on it you will be able to find them in my book by clicking here.
Once you have your number for the pour you will order your truck for a day that is not raining preferably and also order a pump truck to get the concrete into the form.
Once the two trucks arrive, make sure you have some other people there to help you get the concrete into the form and finished. Having a vibrator or renting one for this will ensure, in theory, a nice solid concrete wall afterwards, however, i have seen walls come out super bad and honey combed even with a vibrator, and done other walls with only my sledge and made them better then most, so to each their own. Having a vibrator will indeed save time and if done right ensure a quality finished product.
Once you have finished pouring your concrete, using the vibrator to release air and water bubble, you are ready to finish the top areas. Using your trowel, begin finishing the top area level with the plywood. Once this area is all smooth and even you are finished and time to let it set.
Once the concrete is set, it is time to strip the forms. Stripping the forms is done by essentially reversing the action taken to install all the bracing and plywood. First remove all the bracing, being careful not to let anything fall or damage to concrete. Using a pry bar in areas, pry away the plywood from the concrete once the bracing is all removed and the two end pieces of plywood are removed, continue re carefully and gently remove all the nails from the plates, remember the wall is taking all the load now, and the ply is not supporting anything. Everything can be removed without limit as long as it comes off in the same order it was placed. Take your time and make sure to remove all nails and ensure the lumber is stacked for future use. Best of luck and I hope you enjoyed reading this.


